By Kim Fogle
Whether it's kindergarten soccer or intercollegiate athletics, sports are a popular subject for photography. With all that fast movement and tricky lighting situations, though, it can be difficult to freeze an athlete in action. Here are a few tricks to boost your sports photography--and help you catch great action shots during any sporting event.
1. Auto Sports mode vs. Program Mode
It can be tempting to flip to the Auto Sport mode on the dial and shoot away, but you may end up with a lot of pictures you're unhappy with. If you're photographing an outdoor event--such as cross country, tennis, or soccer--and there is plenty of daylight, then the Auto Sport mode should be just fine. With enough light, any camera can take a great picture of fast action. You might run into some trouble when the events move inside, however.
One of the things that makes an auto mode so convenient is the very thing that can spoil pictures of indoor sports. Part of what the camera will do in Auto Sport mode adjusts the ISO for you. To get the best possible picture, the camera tries to keep the ISO as low as possible. This means that there will be less "noise" in the final image, but it also means that the camera will have to keep the shutter open longer. When that happens, you're more likely to capture the blur of an athlete's motion. How do you keep your shutter speed fast without resorting to the manual mode? Switch to the Program mode!
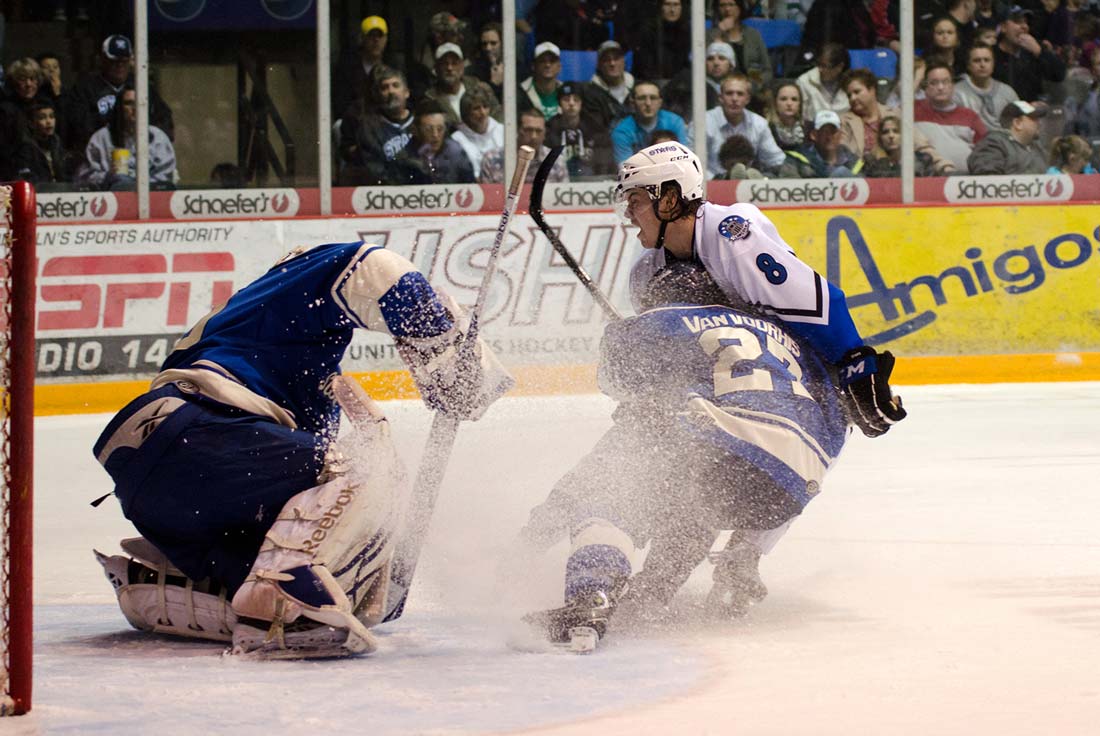
In Program mode, you'll be able to adjust the ISO on your own. You'll want to keep it fairly high in order to get a fast shutter speed. For example, I set my camera's ISO to 1250 when shooting hockey games, but I've learned that a particular ISO works best for my camera. (Each camera is different!) Remember, though, that the higher the ISO, the more noise you will get in the picture, so if you can keep that number around 1000, you'll get a better result.
You will also need to adjust the release mode, from Single Shot to Continuous. Continuous shooting will allow you to hold down the shutter and take several pictures in a row, which is helpful when an athlete is setting up to serve or shoot a free throw.
2. Manual Shooting
To get the best performance out of a camera when photographing sports, it's best to switch the camera into a manual setting. Some photographers prefer to use Aperture Priority, others use Shutter Priority, and some go with full Manual.
Aperture Priority: This is a helpful setting when you have a lens with a wide aperture (f/2.8, for example). You will be able to set the aperture to its widest point and then let the camera worry about setting the shutter speed for you. You will still want to set the ISO, white balance, and continuous release.
Shutter Priority: If you have a lot of light or you know what shutter speed you need to stop action, you can go ahead and set the shutter to whatever speed you need, and the camera will set the aperture for you. Remember, though, that a shutter speed that is too fast will result in a dark picture while a speed that is too slow will get you a blurry shot. To capture movement, it's best to have a shutter speed of 1/125 or faster, depending on the sport. Sports with a lot of action or small but quick movements (hockey or gymnastics, for example) will likely need faster shutter speeds.
Full Manual: For the very best results, try manual mode. Since you have the ability to override the settings the camera would put into place, you can over- or underexpose the picture if need be. If you find yourself shooting in one particular venue, it's a good idea to write down the settings you use most often. That way, you can get them set before the game starts, and make minor adjustments as it progresses.
As a hockey photographer, I have found that shooting games in Manual mode work the best. When I look at the light meter, it says that the shot will be overexposed--but from experience, I know that balancing everything out according to the light meter results in gray ice instead of white and motion blur on sticks, arms, and the puck. Although the camera thinks I'm wrong, I've learned that setting my camera to ISO 1250 with an aperture of f/2.8 and a shutter speed of 1/500 generally results in a proper exposure, even though the light meter reads otherwise!
3. Don't Forget to Warm Up
The warm-up period that occurs before a game is a great time to practice your action shots and to see if the settings you are using will work for the game itself. With the pressure off, you can snap a whole set of pictures to sharpen your own skills. You may even end up with the best picture of the night--like when your child does something silly to get herself hyped up for the game...and you get the shot!
4. Aim For the Torso
If you're using Single-point Autofocus, it's tempting to try to focus on an athlete's head, but this can make a difficult shot even harder than it needs to be. Compared to the rest of the body, the head is relatively small, and in the middle of an intense, fast-paced game it can be nearly impossible to focus on. When you aim for the torso you give yourself a larger area to focus on. It could mean the difference between locking the focus on a gymnast in the middle of an acrobatic leap...or on the audience behind her.
5. Don't Just Shoot the Action
Some of the most emotional parts of a game occur during lulls in the action--during a tense timeout, when the score is tied and there are only a few minutes left, after making an important free-throw, or even on the bench when your child is waiting to be called in to play. Don't forget these moments. They can be just as exciting--and memorable--as the big play or the perfectly executed move.
Bonus Tip:
Sports are tough to photograph. Fortunately, in the digital age, you can take hundreds of shots during a game and delete the ones that don't turn out, so don't worry if every shot you take isn't a keeper. There's an old photography adage that still rings true: "Shoot a ton, hope for one." For every amazing picture you see in Sports Illustrated, there are hundreds--if not thousands--of shots that didn't make the cut. So keep shooting, and keep trying. Coaches will tell players that practice makes perfect, and the same is true for you.
P.S. Remember, we're always here to help you improve your photography game, so give us a call or book a one-on-one photography class with us today!


